SwiftUIでインタースティシャル広告を実装する方法
インタースティシャル用のクラスを用意
import GoogleMobileAds
#if DEBUG
let adUnitID = ""
#else
let adUnitID = ""
#endif
final class Interstitial: NSObject, GADFullScreenContentDelegate {
private var interstitial: GADInterstitialAd?
override init() {
super.init()
loadInterstitial()
}
func loadInterstitial(){
let request = GADRequest()
GADInterstitialAd.load(withAdUnitID:adUnitID,
request: request,
completionHandler: { [self] ad, error in
if let error = error {
print("Failed to load interstitial ad: \(error.localizedDescription)")
return
}
interstitial = ad
interstitial?.fullScreenContentDelegate = self
}
)
}
/// Tells the delegate that the ad failed to present full screen content.
func ad(_ ad: GADFullScreenPresentingAd, didFailToPresentFullScreenContentWithError error: Error) {
print("Ad did fail to present full screen content.")
}
/// Tells the delegate that the ad presented full screen content.
func adDidPresentFullScreenContent(_ ad: GADFullScreenPresentingAd) {
print("Ad did present full screen content.")
}
/// Tells the delegate that the ad dismissed full screen content.
func adDidDismissFullScreenContent(_ ad: GADFullScreenPresentingAd) {
print("Ad did dismiss full screen content.")
loadInterstitial()
}
func showAd(){
let root = UIApplication.shared.windows.first?.rootViewController
interstitial?.present(fromRootViewController: root!)
}
}
SWiftuiのボタン押下時に呼び出し
変数は用意してください
//保存ボタン
Button(action:{
self.showingAlert = true
}){
Image(systemName: "tray.and.arrow.down")
Text("保存")
}
.padding(.trailing)
.alert(isPresented: $showingAlert) {
Alert(title: Text("保存しますか"),
primaryButton: .cancel(Text("キャンセル")),
secondaryButton: .default(Text("保存"),
action: {
interstitial.showAd()
}))
}


【Swift UI】配列を特定の文字で絞り込む方法
ちょっとだけ詰まったので載せておきます。
Textfieldに入力された文字でLISTの絞りこみをしたかったので実装しました。
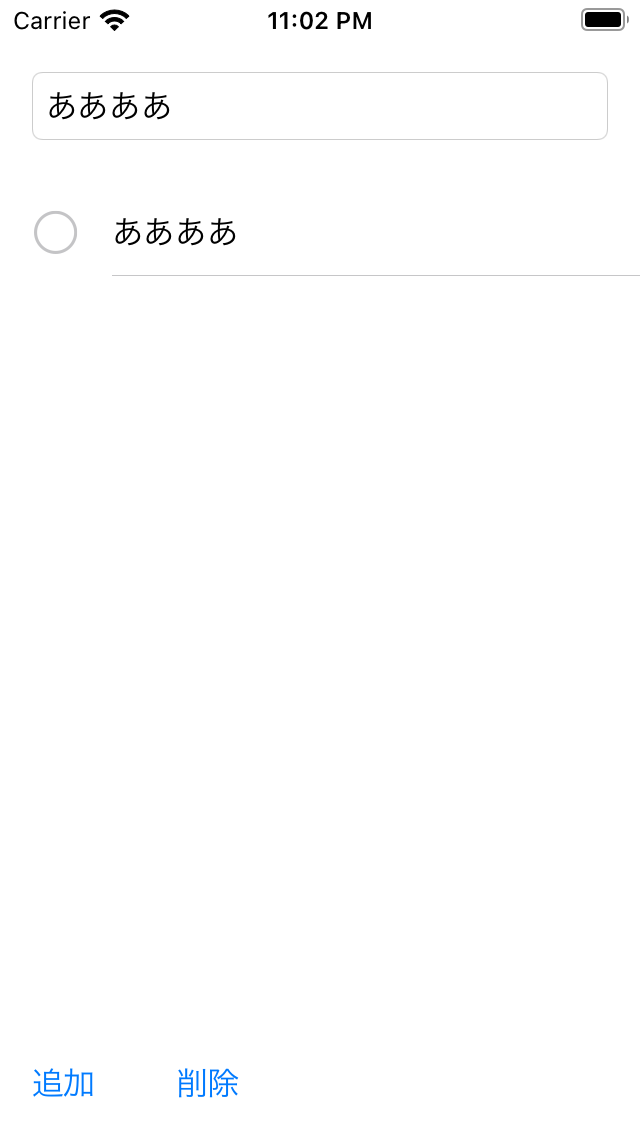
こんな感じです。

リストは配列をループさせて表示しているので、Textfield入力された文字で配列を絞り込めば上記が実現できます。
nameがテキストフィールドの値でitemが配列です。
絞り込まれた配列はsearchArray の中に入ります。
ContentView一部抜粋
                    self.searchArray = item.filter{
                        if $0.localizedCaseInsensitiveContains(name){
                            return true
                        }
                        return false
                    }
ContentView.Swift
//
//  ContentView.swift
//  olnpickGolfer
//
//  Created by Yosuke Yoshida on 2021/02/09.
//

import SwiftUI

struct ContentView: View {

    @State private var name:String = ""
    @State private var item = getDataName()
    @State private var isShowingAlert = false
    @State private var showingAlert = false
    @State var text: String = ""
    @State private var selectionValue: Set<String>
        = []
    @State var searchArray = [String]()

    var body: some View {

        VStack {
            TextField("検索", text: $name,onCommit: {

                item = getDataName()

                if self.name == "" {
                    item = getDataName()
                } else {
                    self.searchArray = item.filter{
                        if $0.localizedCaseInsensitiveContains(name){
                            return true
                        }
                        return false
                    }
                    item = searchArray
                }
            })
            .padding()

            // 入力域のまわりを枠で囲む
            .textFieldStyle(RoundedBorderTextFieldStyle())

            List (selection: $selectionValue) {
                ForEach(item, id: \.self) { item in
                    Text(item)
                }
            }
            .environment(\.editMode, .constant(.active))

            Spacer()

            HStack {
                Button("追加") { isShowingAlert = true }
                    .padding()

                if !item.isEmpty {
                    Button("削除") {
                        rowRemove(delList: selectionValue)
                        selectionValue = []
                    }
                    .padding()
                }

                Spacer()

                TextFieldAlertView(
                    text: $text,
                    isShowingAlert: $isShowingAlert,
                    placeholder: "",
                    isSecureTextEntry: false,
                    title: "名前登録",
                    message: "名前を入力してください",
                    leftButtonTitle: "キャンセル",
                    rightButtonTitle: "登録",
                    leftButtonAction: nil,
                    rightButtonAction: {
                        if item.contains(text) {
                            alertD()
                        } else {
                            registDataName(name: text)
                            item = getDataName()
                        }
                    }
                )
                .frame(width: 0, height: 0, alignment: /*@START_MENU_TOKEN@*/.center/*@END_MENU_TOKEN@*/)
            }
        }
    }

    func rowRemove(delList:Set<String>) {
        var counter:Int = 0
        var isDel = false
        var tmpItem = getDataName()

        while counter < tmpItem.count {

            for data in delList {
                if tmpItem[counter] == data {
                    tmpItem.remove(at: counter)
                    isDel = true
                }
            }
            if isDel {
                counter = 0
                isDel = false
            } else {
                counter+=1
            }
        }

        reWriteDataName(nameList: tmpItem)
        item = getDataName()
        self.name = ""
    }
}

struct ContentView_Previews: PreviewProvider {
    static var previews: some View {
        ContentView()
    }
}
【Swift UI】初期起動画面を変更する方法
SceneDelegate.swift
let contentView = SwiftUIView()ここの値を起動したいViewの名前に変更してください。
    func scene(_ scene: UIScene, willConnectTo session: UISceneSession, options connectionOptions: UIScene.ConnectionOptions) {
        // Use this method to optionally configure and attach the UIWindow `window` to the provided UIWindowScene `scene`.
        // If using a storyboard, the `window` property will automatically be initialized and attached to the scene.
        // This delegate does not imply the connecting scene or session are new (see `application:configurationForConnectingSceneSession` instead).

        // Create the SwiftUI view that provides the window contents.
        let contentView = SwiftUIView()//ここの値を起動したいViewの名前に変更する。

        // Use a UIHostingController as window root view controller.
        if let windowScene = scene as? UIWindowScene {
            let window = UIWindow(windowScene: windowScene)
            window.rootViewController = UIHostingController(rootView: contentView)
            self.window = window
            window.makeKeyAndVisible()
        }
    }
【Swift UI】LISTが複数選択と削除が同居できない
Swift UIのリストについての記事です。
UserDefaultに保存されているデータをLISTに表示させ、選択できるような画面を作成しました。
ついでに削除までできたら便利だなぁと考えて調べてみましが、両立させることができませんでした。
最終的にはかなりの力技で実装しました。誰か知ってたら教えて欲しいものです。
①複数選択を可能にする。
→できる。

ContentView.swiftの一部
 List (selection: $selectionValue) {
  ForEach(item, id: \.self) { item in
                    Text(item)
       }
    }
   <u> .environment(\.editMode, .constant(.active))</u>
②削除可能
→できる。
左にスワイプしたら削除ボタンが出てきます。

List (selection: $selectionValue) {
                ForEach(item, id: \.self) { item in
                    Text(item)
                }
                /// 行削除操作時に呼び出す処理の指定
                .onDelete(perform: rowRemove)
            }
③両立
→色々調べたが、できない。
選択はできるが、スライドしても削除ボタンが出てこない。。
            List (selection: $selectionValue) {
                ForEach(item, id: \.self) { item in
                    Text(item)
                }
                /// 行削除操作時に呼び出す処理の指定
                .onDelete(perform: rowRemove)
            }
            .environment(\.editMode, .constant(.active))
解決策としては、削除ボタンとリストから削除する処理を自前で実装して、乗り越えました。
//
//  ContentView.swift
//  olnpickGolfer
//
//  Created by Yosuke Yoshida on 2021/02/09.
//

import SwiftUI

struct ContentView: View {

    @State private var name = ""
    @State private var item = getDataName()
    @State private var isShowingAlert = false
    @State private var showingAlert = false
    @State var text: String = ""
    @State private var selectionValue: Set<String>
        = []


    var body: some View {

        VStack {
            TextField("検索", text: $name)
                .padding()
                // 入力域のまわりを枠で囲む
                .textFieldStyle(RoundedBorderTextFieldStyle())

            List (selection: $selectionValue) {
                ForEach(item, id: \.self) { item in
                    Text(item)
                }
            }
            .environment(\.editMode, .constant(.active))

            Spacer()

            HStack {
                Button("追加") { isShowingAlert = true }
                    .padding()

                if !item.isEmpty {
                    Button("削除") {
                        rowRemove(delList: selectionValue)
                        selectionValue = []
                    }
                        .padding()
                }

                Spacer()

                TextFieldAlertView(
                    text: $text,
                    isShowingAlert: $isShowingAlert,
                    placeholder: "",
                    isSecureTextEntry: false,
                    title: "名前登録",
                    message: "名前を入力してください",
                    leftButtonTitle: "キャンセル",
                    rightButtonTitle: "登録",
                    leftButtonAction: nil,
                    rightButtonAction: {
                        if item.contains(text) {
                            alertD()
                        } else {
                            registDataName(name: text)
                            item = getDataName()
                        }
                    }
                )
                .frame(width: 0, height: 0, alignment: /*@START_MENU_TOKEN@*/.center/*@END_MENU_TOKEN@*/)
            }
        }
    }

    func rowRemove(delList:Set<String>) {
        var counter:Int = 0
        var isDel = false


        while counter < item.count {

            for data in delList {
                if item[counter] == data {
                    item.remove(at: counter)
                    isDel = true
                }
            }
            if isDel {
                counter = 0
                isDel = false
            } else {
                counter+=1
            }
        }

        reWriteDataName(nameList: item)
        item = getDataName()
    }
}


struct ContentView_Previews: PreviewProvider {
    static var previews: some View {
        ContentView()
    }
}
SwiftUIでは入力ダイアログはサポートされない件
2019年6月から開始されたSwiftUIですが、触ってみた感じ、かゆいところに手が届かないなぁと思いました。
発端は、入力ダイアログを使おうと思って、調べてみたらSwift UIではAlert表示はできるが、ユーザーから入力させるよなテキストフィールドは追加できないとのこと。
うーん。
SwiftUIで完結できると記載されている記事をありましたが、エラーになってしまいうまく動きませんでした。
面倒なので、エラー内容を追うことはしませんでした。m(__)m↓↓
alert — SwiftUIでTextFieldをAlertに追加する方法は?
解決策としては、
UIViewControllerRepresentable プロトコルを継承して、UKit の UIAlertController をラップしたViewを作成することで実装すれば良いとのこと。
下記サイトに記載されているコードを完コピで動きました。
【SwiftUI】TextField付きAlertを表示する – .NET ゆる〜りワーク
ただし、TextFieldAlertViewが要素の一部として認識されてしまい、レイアウトが崩れてしまうので、サイズを0にすることで解決しました。
TextFieldAlertView(
text: $text,
isShowingAlert: $isShowingAlert,
placeholder: "",
isSecureTextEntry: false,
title: "名前登録",
message: "名前を入力してください",
leftButtonTitle: "キャンセル",
rightButtonTitle: "登録",
leftButtonAction: nil,
rightButtonAction: {
if item.contains(text) {
alertD()
} else {
registDataName(name: text)
item = getDataName()
}
}
)
.frame(width: 0, height: 0, alignment: .center)
早いとこアプデで追加されるといいなぁー